January 7, 2022 by Klaus Crow

As a guitar student you want to learn your scales inside out, not just to expand your music theory or to develop dexterity, but to learn to solo and improvise.
In order to solo and improvise you need to know the words of the language. You need to know how to use those words in a fluent manner with confidence and ease to express your musical emotions.
This is where the scale comes in. The scale contains the letters and the words to tell your story.
In this lesson I will give you the exercises to really dig into the scale and memorize it from top to bottom, backwards and forwards so you can start your journey to learn to solo and improvise.
We will use the G major scale as an example, but you can apply this to any scale.
There’s a lot of exercises and examples here so take your time with it. Start with one exercise and practice it until you can play it at a comfortable level, then move on to the next. Before you know it your fingers are running the show.
Let’s dive in!
Play in Position. First learn the scale playing it in position using the appropriate fingering. “Playing in position” means your left hand remains in a fixed location, with each finger assigned to a specific fret. See below in example 1. Now play the scale following example 2 and use the finger positioning of example 1.
Numbers on the dots: 1 = first finger assigned to the second fret, 2 = second finger assigned to the third fret, 3 = third finger assigned to the fourth fret, 4 = fourth finger assigned to the fifth fret. The red dots indicate the root note of the scale (in this case the G note).
Example 1:

Example 2:
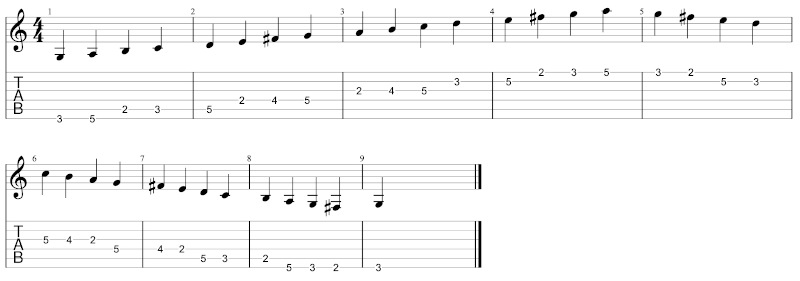
Play with one finger. In this exercise you play the scale with only one finger (see example 3), so you become really conscious of where each note in the scale is located. Don’t underestimate this exercise. It is really important. Play it like example 2, but with the fingering of example 3.
Example 3:

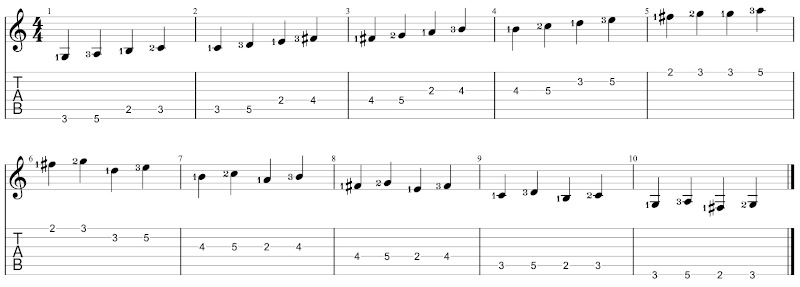
Mixing between with two fingers. Now play the scale switching between two fingers, using your first and second finger or first and third finger for every two notes. I’ve put the finger positioning in the standard notation next to each black quarter note. See example 4.
1 = index finger, 2 = middle finger, 3 = ring finger.
Example 4:
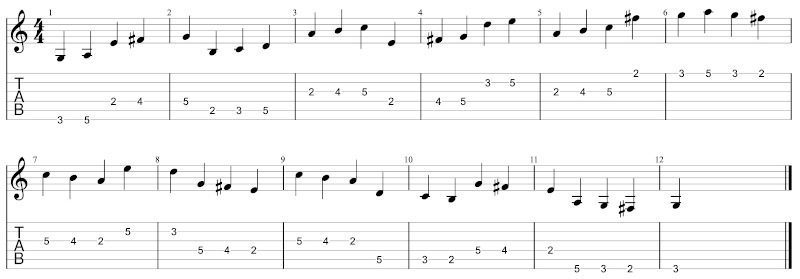
String skipping. In this exercise (see example 5) you practice the scale using the string skipping technique, another way to really get the notes locked into your fingers. This way you learn to randomly jump to any three notes on any given string without having to think about it. Use the finger positioning of example 1 for this exercise.
Example 5:
Scale sequences. Scale sequences are patterns that help you create melodic phrases. It’s an essential exercise to develop the muscle memory you need to come up with musical ideas within the scale. Practice this one on a regular basis. See example 6. You’ll be surprised what it will do for your playing.
Example 6:

Hammer-on scale exercise. In example 7 we’re going practice hammer-ons. You want to incorporate those into your solos from time to time, so you’ve got to practice them ascending and descending the scale. Use the same finger positioning as in example 4.
Example 7:
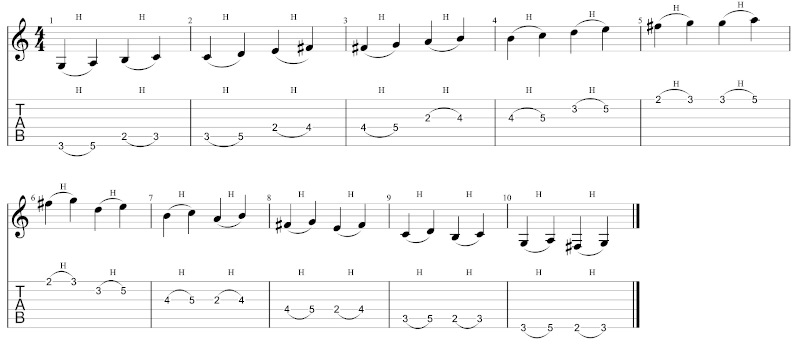
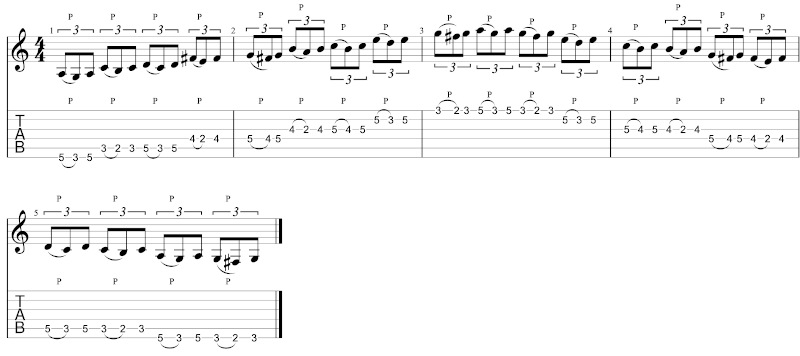
Pull-offs scale exercise. Just like hammer-ons, pull-offs are a nice musical technique to incorporate into your melodic ideas. See example 8. In this exercise we are playing the notes in triplets to add a nice feel to the pull offs. Use example 4 finger positioning.
Example 8:
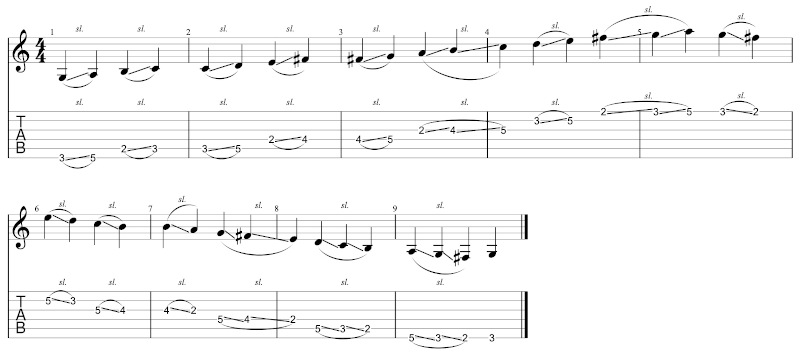
Slides. In the exercise below you practice slides from one note to the next. Work your way up and down the scale. Just like the hammer-ons and pull-offs, a slide is a beautiful way to connect notes and make your melody sound more fluid. See example 9.
Example 9:
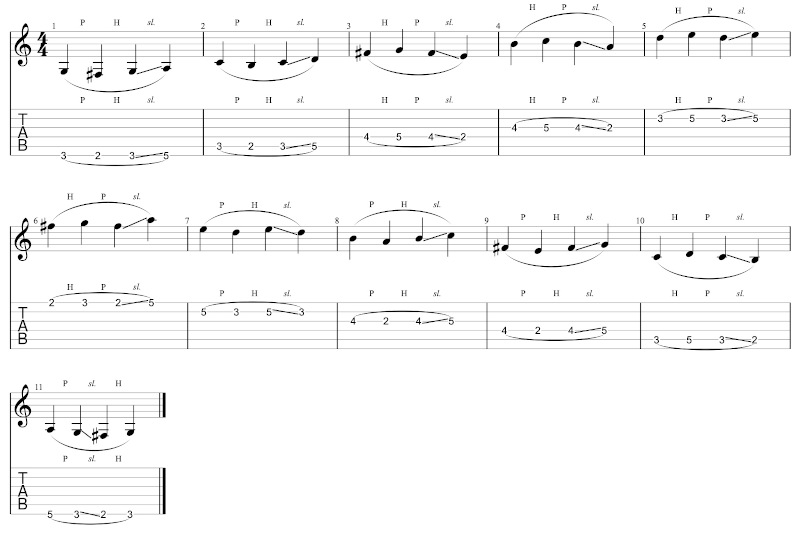
Hammer ons, pull offs and slides. In example 10 we’re gonna combine all three techniques, which is another great tool to make your soloing sound more gracious. Don’t forget this is an exercise to learn the skill. You want to add this technique here and there throughout your soloing, not constantly, allowing your soloing to sound like one big exercise ;)
Example 10:
Memorize the notes of the scale. Learn to name the notes of the scale from top to bottom. See example 11. Also learn the notes randomly. Point out random notes in the scale and speak them out loud. Make sure you got them under your belt.
Example 11:

Applying major scale bend ups. In example 12 you can find a variation of good sounding bend-ups that you can use to make your solos really come alive. Don’t forget them. Bend ups are the juice.
Example 12:

Diatonic triads. A triad is a set of three notes stacked in 3rds. In example 13 you’re playing consecutive triad arpeggios (three note arpeggios) in the scale of G major. Listen carefully while you play the exercise and you can hear the nice melodic structures that will give you lots of beautiful ideas.
Example 13:

Play random notes from the scale. Here’s another important memorization exercise. Pick any note within the scale randomly. Start out slow and increase your pace gradually. Point out the notes of the scale on different strings at different frets. Once you feel comfortable with that without making any mistakes start over and now try to speak out the note names of those random notes out loud.
All 12 keys. It’s mandatory the learn the scale in every key, along with the exercises. If you want to be an accomplished guitar player you need to learn to play in all keys. Once you feel comfortable playing some of the scale exercises, try some random positions on the guitar or use the cycle of fourths to dominate all 12 keys.
Learn to create and play melodies. Creating melody and learning to improvise on the spot is a skill you have to develop and practice consistently. It’s not an end goal, but an ongoing process. It’s a joy, a challenge and one of the most gratifying skills that you want to accomplish as a guitar player.
Start with creating small melody lines of 3 or 5 notes within the scale. Use some hammer-ons, pull-offs, slides, or bend-ups. Use your ears and your imagination. Experiment. Try, fail, learn and try again. Use different note lengths, rhythmic ideas, space between the notes, and dynamics to improve your lead guitar phrasing. Listen carefully to other guitar players how they play melody, and recreate some of those melody lines or phrasing in your own way.
Jam tracks. Once you’ve practiced creating some tiny musical ideas on the spot, the next thing you want to do is to learn to play those lines over a jam track. If you are playing a melody within a G major scale, you want to play over a G major jam track. You could also create your own jam track by recording a G major chord progression and solo over those chords.
To create your own melodies and solo will be a bit of a challenge in the beginning, but after some practice you’ll gonna feel the change coming, you’re gonna notice the progress and experience the fun and glory of improvisation. Just keep at it.
Different scale positions and different scales.
Once you can play all these techniques and exercises in the first position/pattern of the major scale and apply it to your soloing and improvisation with comfort and confidence, you can move on to other major scale positions on the neck, or totally different scales. In other words, there is a lot to learn, so take it easy.
Above all, enjoy the process!
If you want to learn the Pentatonic/Blues scale inside out for soloing & improvisation check out the 50CoolBluesLicksImprovisation Course
Leave a Reply