GUITARHABITS

Free Quality Guitar Lessons

  • Home
  • Best Posts
  • Categories
  • All Lessons
  • Donate♥
  • About
  • YT
  • IG
  • FB

Effective One-Octave Major Scales and Why!Part II

By Klaus Crow 6 Comments

Hi folks, today we’re going to dive into the one-octave major scales Part II. A nice, compact, clear and focused guitar lesson. If you haven’t learned the part I yet, you can check it out here: Effective One-Octave Major Scales and Why! Part I

Reminder Why You Want to Learn One-Octave Scales

Remember, you want to learn the one-octave major scale to easily identify the shape and structure of the scale, the notes within the scale, and the intervals. Moreover, the one-octave scale is easier to play for beginners and opens new doors, breeds new insights and improves the playing of intermediate guitar players.

Starting from the Root Note on the A-string

Today we are learning three major scale shape/patterns with the first (root) note starting on the A-string (5th string).

Tip: Learn and memorize the notes on the A-string so you can instantly recognize the key of the scale when you want to move the scale up or down the fretboard.

Major Scale Fingering

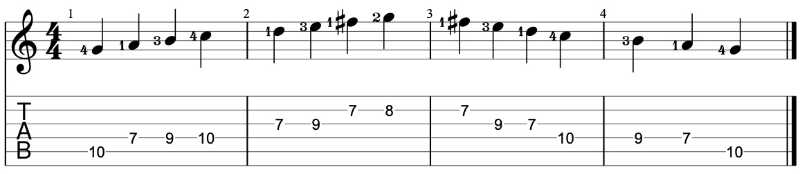
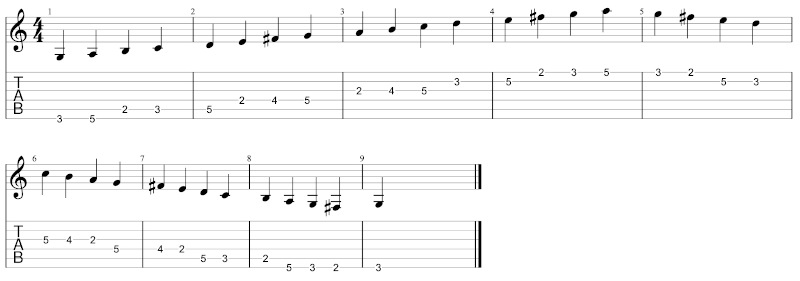
For the major scale examples and tablature below I’ve notated the fret-hand fingering. The numbers next to the notes on the note staff right above the tablature indicates the fret-hand fingers:

| 1 = index | 2 = middle finger |3 = ring finger | 4 = pinky |

How to read tablature? Check out How to Read Guitar Tabs – Tablature

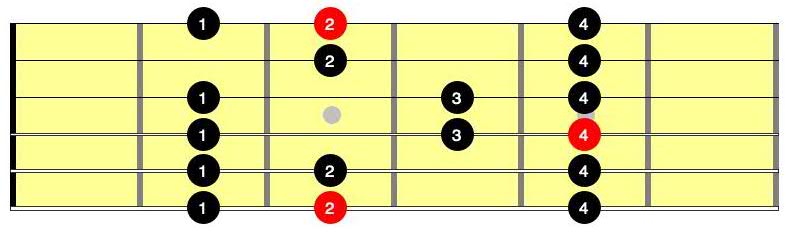
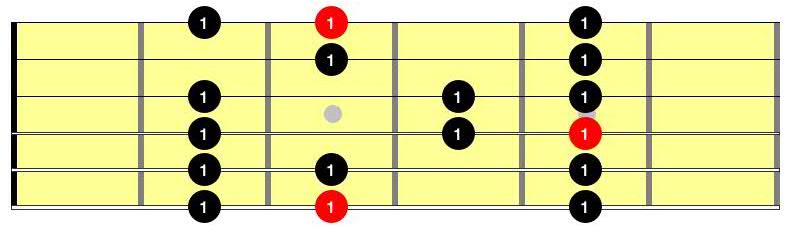
The numbers in the yellow neck diagrams also indicate the fret-hand fingering. The neck diagrams also clearly show what the shape or pattern looks like. Learn to visualize and memorize the shape of each pattern.

Make sure you play the scale shapes using alternative picking. Strictly use alternating down and up strokes. The first note you play is a downstroke, the second an upstroke, the third one a downstroke, the fourth one an upstroke and so on.

Practice the scale in every Key

In the examples below we play the G major scale, but the goal is to learn these scale shapes/patterns in every key. Once you got the scale under your fingers learn the pattern in different keys. Just move the entire scale up or down the fret and change keys easily. Need more help with that? A more detailed explanation on this in Part I

Without further ado..

Enjoy!

MAJOR SCALE SHAPES – ROOT NOTE STARTS ON THE 5TH STRING

G MAJOR SCALE fingering / shape / pattern #4

Continue Reading

Effective One-Octave Major Scales and Why! Part I

By Klaus Crow 20 Comments

When you learn your first scales you usually start with two-octave scales, because they span all six strings of the guitar. You play from the Low E-string all the way up to the high e-string.

That’s great! It’s important you learn the two-octave scales inside out, but one-octave scales have their own effective purpose that will serve your playing in a different and complementary way.

Why You Want to Learn One Octave Scales

One of the reasons you want to learn one-octave scales is because of their simplicity. By using only one octave it’s easier to see the shape and structure of the scale, the notes within the scale, and the intervals. The scale is more user-friendly, easier to play, memorize and apply around the fretboard.

There’s another great benefit to learning one-octave scales. Once you got them under your fingers it’s only a matter of connecting the dots to lay out two octave and three-octave scales, since they are made up of one-octave scales.

Note: This post is part of a small series where you will learn one-octave major scale shapes across the entire guitar neck that will help you understand and own the major scale landscape.

Starting from the Root Note on the Low E-string

Today we’re learning three major scale shape/patterns with the first (root) note starting on the Low E-string (6th string).

Tip: For this lesson learn and memorize the notes on the low E-string so you know and recognize the key of the scale when you want to move the scale up or down the fretboard.

Major Scale Fingering

For the major scale examples and tablature below I’ve notated the left hand fingering (for right handed players). The numbers next to the notes on the note staff right above the tablature indicates the left hand fingers:

1 = index
2 = middle finger
3 = ring finger
4 = pinky

The numbers in the yellow neck diagrams also indicate the fingers. The neck diagrams also clearly show what the shape or pattern looks like. Learn to visualize and memorize the shape of each pattern.

Continue Reading

3rds Intervals over 5 Major Scale Shapes/Positions

By Klaus Crow 3 Comments

I hope you are doing okay with everything that is going on now. These are crazy times, but we have to make the best of it. We have to help each other out while keeping a safe distance, be considerate of others, smile to people to relieve a bit of their burden, but with all that don’t forget yourself along the way. Being kind to yourself too. Have a bit of fun. Try to enjoy the present moment.

For those of you who stay at home, you might have some more time on your hands now to enjoy the guitar, develop a nice practice routine, and make some good progress. Well, here’s a great guitar workout for you…

Practicing melodic intervals really developed my skills to solo and improvise over major chord progressions. Just by going through the scale intervals on a regular basis you are training the muscle memory for your fingers and acquiring the vocabulary for your creative mind to help you shape your musical brain and come up with melodic ideas. It’s an exercise that is not to be underestimated.

In this lesson we are going to learn “melodic intervals in 3rds” following the major scale. We’ll practice these 3rd intervals over 5 different scale shapes/positions across the neck, so we’ve got a great workout for you! Don’t worry we’ll take it step by step.

Make sure you know the major scale in 5 shapes/positions before you start this lesson, but on the other hand you can also skip that for now if you just became excited to dive into this lesson. You can always come back to that later. I can imagine you want to try at least the first exercise to know what we’re talking about here. I totally understand.

Another upside is that the exercises will train your ear to recognize 3rd intervals. This will improve your aural skills, which is a important part of becoming an accomplished musician (Try to sing along the notes as you play the exercises). The practice of playing the intervals will also increase your dexterity. A win-win situation in many ways.

Continue Reading

How to Learn a Scale Inside Out to Improvise a Guitar Solo

By Klaus Crow Leave a Comment

As a guitar student you want to learn your scales inside out, not just to expand your music theory or to develop dexterity, but to learn to solo and improvise.

In order to solo and improvise you need to know the words of the language. You need to know how to use those words in a fluent manner with confidence and ease to express your musical emotions.

This is where the scale comes in. The scale contains the letters and the words to tell your story.

In this lesson I will give you the exercises to really dig into the scale and memorize it from top to bottom, backwards and forwards so you can start your journey to learn to solo and improvise.

We will use the G major scale as an example, but you can apply this to any scale.

There’s a lot of exercises and examples here so take your time with it. Start with one exercise and practice it until you can play it at a comfortable level, then move on to the next. Before you know it your fingers are running the show.

Let’s dive in!

Play in Position. First learn the scale playing it in position using the appropriate fingering. “Playing in position” means your left hand remains in a fixed location, with each finger assigned to a specific fret. See below in example 1. Now play the scale following example 2 and use the finger positioning of example 1.

Numbers on the dots: 1 = first finger assigned to the second fret, 2 = second finger assigned to the third fret, 3 = third finger assigned to the fourth fret, 4 = fourth finger assigned to the fifth fret. The red dots indicate the root note of the scale (in this case the G note).

Example 1:

Example 2:

Play with one finger. In this exercise you play the scale with only one finger (see example 3), so you become really conscious of where each note in the scale is located. Don’t underestimate this exercise. It is really important. Play it like example 2, but with the fingering of example 3.

Example 3:

Continue Reading

« Previous Page
Next Page »

Most Popular Posts

Easy Guitars Songs For Beginners

Best Acoustic Guitars under 450 Dollars

8 Most Important Chords for Beginners

Learn The Guitar Fingerboard in 16 Days

Easy Guitar Riffs & Intros for Beginners

16 Legendary Fingerpicking Patterns

The 5 Pentatonic Scale Shapes

How to Play Beautiful Open Chord Shapes

Best Guitar Amps for Practice and Small Gigs

Categories

  • Chord Melody
  • Chords
  • Chord progression
  • Strumming | Rhythm
  • Fingerpicking
  • Scales
  • Soloing | Improv
  • Licks
  • Riffs
  • Excercise
  • Motivation
  • Rock
  • Blues
  • Gear
  • Songs
  • Solos
  • Music theory
  • Practice
  • Intervals
  • Arpeggios
  • Vocals | Singing
  • Ear training
  • Songwriting
  • Recording
  • Performing
  • Online guitar tools
  • Country
  • Metal
  • Jazz
  • Pop of all times
  • Best buy
  • Christmas
  • Ear practice
  • Lifestyle Design
  • Beginner
  • Intermediate
  • Advanced
  • Uncategorized

Copyright © 2025 · Guitarhabits - About - Privacy Policy - Change Consent - Do Not Sell My Personal Information - Cookie Policy

Note: As an Amazon Associate I earn from qualifying purchases.

Scroll Up